Showing posts with label Decor. Show all posts

Saturday, June 6, 2015

End of the Year...No Thank You

I kind of detest breaking down my classroom at the end of the year.  It's so anti-climatic. All that hard work by the students is taken down.  And all of the classroom decor that I painstakingly cut, laminate and hung with velcro/sticky tack/command strips just gets tossed or shoved into a box.  I usually retrain my focus on what I love and that is decorating all over again in a couple months time!

As I watched my news feed fill with teachers end of the year gifts, I was planning what I wanted to tweak this year.  I had these word wall headers I made a couple years ago when we first started the common core standards and there was more of a push on informational texts and topics.  I love these headers and their bright colors so I decided I wanted more of that.  I spend 7.5+ hours a day for 180+ days in the classroom so I just want to look around and feel happy.


My inspiration:  nonfiction alphabet headers

As I started making new things for the classroom I kept having more and more ideas.  So my tweaks turned into a 100+ page colorful classroom decor set!  This set is full of things that your students will use on a daily basis, such as, jobs, table numbers, number posters, ABC posters, word wall headers, word wall words, birthdays, schedule, hand signals, nameplates and more.  You can pick it up here: Colorful Classroom Decor 


I also made the ABC posters as a stand alone: Colorful Alphabet Posters


I also made Bohemian Classroom Decor based off this digital paper that has feathers on it which I L.O.V.E!  
Aren't the feathers lovely?


Now what would a post be without a freebie?!  Today I have essential items for your classroom door!  These are my must haves and I hope you enjoy them.  Pick it up here:  Door Decor

Sight word slap is a great way for students to learn sight words in a fun way.  Just print, laminate and write a new word with dry erase marker daily.  Students will high five the word and say it aloud.

Math Password is a fantastic way to give your students more practice. Again print, laminate and write a new math problem every day.  As the students pass, they will whisper the answer.  This is a great way to spiral or practice the tricky bits.  *Tip: Any child that answers incorrectly I send to the back of the line to think.  If they still don't get it right on the second try, I quietly reteach several students, model the problem, or give them a strategy.

Welcome to pennant is just a bright, colorful, space saving way to add a little cheer to your door.  I made it and intend to punch holes on the sides and thread through ribbon.


So are you planning for the new school year or actually taking time to enjoy summer?

I


Wednesday, August 28, 2013

New year, new photos

This year I made faux bulletin boards to remedy my lack of space to hang anchor charts.  Each child has their own drawer to hold their word work notebook, clipboard, Words Their Way workbook/materials and other personal items.

 The rain gutter lives on!  I love having it for our unit books.
 This year my essential questions are written on frames from ikea with dry erase markers and I used A Cupcake for the Teacher's lovely behavior chart.  I don't know if you can tell but they will move glittered magnets that are numbered.

 I love these frames.  I picked them up from Lakeshore.

 This is our computer area.
 Here is our magnetic word wall (the back of three filing cabinets) and our take home library.
 Here is the small group area.
 This holds the students' book bins and a new bulletin board with our reading strategies  (<--- pick up your copy here).

 This is our leveled and fiction libraries.  Nonfiction is held on the other side of the room.

 These bulletin boards are held for writing.  One is for Lucy Calkin's new checklists and the other is to honor a mentor author.

 Here is the math board with book shopping bags above.
 View from the door
 View from the back
 View from the front

 Under this counter is a secret reading area for four readers with push lights!


Here is a close up of essential questions

Below are charts that started our year:


 We have two new hermit crabs, Barbie and Cool!
Another way to do the bar model :)

Hope you have enjoyed!


Tuesday, July 23, 2013

Classroom Quilt

During my internship, closer to a decade ago than not, my cooperating teacher had a cool classroom quilt that changed monthly.  Each month she took a photo of each child with something festive for the month and asked them a question.  She printed the pictures and the student responses and put together a quilt that she made out of Ziploc baggies.

As I was perusing Michaels I saw something that reminded me of that and knew it was time to make my own quilt.
Can't you imagine all those sweet faces of your kids filling this up?  And we all know kids saying the cutest things!


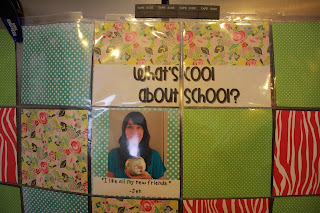
Firs,t let's talk about how it could be used.  What's great about this quilt is that you can tie it to anything you are working on!  You can ask the students a monthly themed question and take their photo with something festive (you'll see below I took my photo with an apple and asked, "What's cool about school?).  You could tie it to a particular subject  and ask an essential question.  It could also be tied to character traits, What makes someone respectful?  What is courage?  The possibilities are endless.

The kids will love having a monthly photo and seeing it up in the classroom.  At the end of the year you can make the kids a scrap book with each of their photos!  Perfect end of the year gift!


Here are the materials you will need:

 Scrap paper in four colors (3 sheets each)
 

12x12 inch Ring Photo Sleeves (these happen to be by We R), includes 10 sheets with 4 - 6x6 inch pockets
 
Directions:

1.Cut your paper into 6 by 6 inch squares

2. Put the papers in choosing a pattern to repeat (do this with 4 sheets)

3. With the other 5 sheets, reverse the order

4. Lay out your design one sheet of the first design then the second of the reverse order...I used a total of 9 album sheets going 3 by 3
{Note at the top center I filled two 6x6 with the same paper for my header}
 
5. Flip it all over and line it up overlapping the part that goes on the rings to the back of the sheet

6. Tape horizontally and vertically connecting all 9 sheets together
{I found that one long piece of tape made it more sturdy}

Because you taped it on the back you can still access the openings on the front!

This is my *somewhat* finished project.  At school I am planning on hanging it with command strips and of course each child will be represented!

I printed the picture as a 4x6 to fit in the opening.

Each month you can ask the students a monthly, theme or essential question, take their photo and type out their response.


***